Wednesday, 25 July 2012

Yarn bombing is coming to a town near you...

Yarn bombing, guerilla knitting, graffiti knitting...


Ever heard of these terms? I have to admit I hadn't until I started seeing knitting cropping up in random areas around bristol! I was in St Andrews park recently, enjoying an afternoon in the sunshine, when I saw a tree covered in colourful knitting, like a tree wooly jumper! This was the second time I had spotted what looked like graffiti knitting in bristol. The first time I thought it was cute and quirky but a one off. But after seeing the tree I had a look online and it seems to be a huge new craze; already popular in london and other big cities. The internet research I did suggests it started as early as 2004 in Europe and became popular in America around 2009 and has slowly been spreading ever since! There is even an international Yarn Bombing day, june 11th! The knitting often crops up over night, much like a knitted Banksy, surprising locals who wake up to a colourful new knitted object! I LOVE the idea of a city covered in knitting!! What a great way to cheer people up, it definitely made me smile! 


So keep your eyes peeled for yarn bombing near you!


I certainly will, and note to self... must keep my camera on me at all times... only had my rubbish camera phone in the park so I appologise for the rubbish photos! Enjoy the sunshine everyone xxx


Tuesday, 17 July 2012

The quilt is out of the cupboard again!!

I finally bought some backing fabric for my quilt yesterday. I had been struggling to decide on the backing and had even been to the fabric shop a few times and left empty handed. The front is such an eclectic mix of bright and patterned fabrics that I wanted to go for something quite mellow but not completely plain.

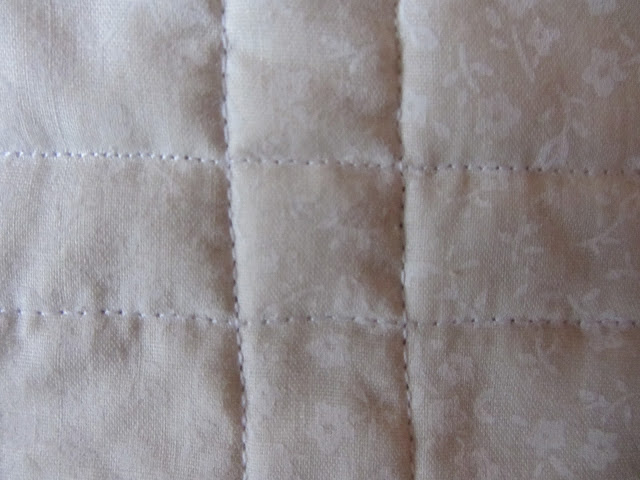
Hhhhmmmmm, this photo makes my lines look quite wonky, don't look too closely! haha

Yesterday I managed to find some very cute cream cotton with tiny tiny white flowers on it. So I got the never-ending quilt back out today and made good progress. I have ummed and ahhhed for a week or so as to which quilting technique I should use. With it being my first quilt, and the fact that it is the size of a queen size duvet (in retrospect a bit ambitious for a 1st attempt!) I was worried that the quilt would be too big to fit through my machine. After speaking to my friends at folksy I decided to quilt in straight lines but avoid stitching "in the ditch" as my seams were a tiny (teeny, tiny) bit wonky! So I went for the double lines, sewing one line a presser foot width away from the seam on each side. This worked well, and although my lines are a tad squiffy (a knock on effect of following my slight wonky seams!!) I love it... it looks like a quilt now!


I did have a bit of trouble trying to haul the sheer weight of the quilt around, and I found that it was so heavy it would pull to the side, making sewing in a straight line very tricky! I experimented with propping the material on chairs, and pinning the rolled up fabric so it wouldn't slip. However the thing I found worked the best was having the rolled up quilt over my shoulder... however this technique should come with a WARNING.... I nearly re-pierced my ear with a stray pin!! I also spent most of the day buried beneath reams of quilt, sadly I was home alone so I dont have any action shots, but I did take some mid seam shots to demonstrate my set-up.


Pins sticking in my head and wonky lines aside I managed to complete the quilting stage today, which I'm really pleased about! Although now that I'm finished I'm almost tempted to freestyle quilt a flower on every other square. There are two things putting me off: 1. If I freestyle applique them using the machine I wont be able to regulate the size, shape so they will all be slightly different and I'm worried it might look messy. and 2. If I do one I will have to do them all and I'm not sure I'm prepared to applique  50 flowers!! haha. What do you think??


Now just to learn how to bind the edges... better get the books out!! Any one know any good websites with easy to follow tutorials? xxx

Monday, 16 July 2012

Summer Holidays

I have just returned from a brilliant weeks holiday in Sardinia, an amazing birthday present from my lovely boyfriend! Aren't I a lucky girl!! We stayed in the south east of the island (the less touristy part) in the stunning in Ulassai in the Sardinian mountains and only 20km from the coast. The area is renowned for its free-climbing and hiking. We went on two hikes during the week, which were tough in the 36 degree heat but amazing and afforded wonderful panoramic views of the mountains and the villages nested between the peaks! 


We went to one of the local beaches most days. The coast is stunning, beautiful beaches with crystal clear water and mountains in the background. We did lots of snorkeling and swimming and generally chilled out on the beaches... I managed to read 4 books whilst lounging on those beaches!! I've just realised I don't have any photos of the beautiful sandy beaches... only the rocky ones! I promise they do exist, but actually they were more touristy so we preferred the stoney beaches as we often had them to ourselves! 


We stayed in a very cute little hotel (http://www.hotelsumarmuri.com/hotel-su-marmuri.html) which displayed lots of beautiful local textile work made by local women known as the "Su Marmuri Cooperativa tessile Artigiana" http://www.sumarmuri.it/cooptessile/prodotti.asp
The website is in italian but does have some good pictures of their work. The hotel also displayed lots of inspiring antiques, art and textiles. 


We are back to reality now, but I do have another two days off before I go back to work so I'm aiming to buy the backing fabric for my patchwork quilt and start the quilting process, eak!! I'l let you know how I get on. 

I hope everyone has had a good week. Amz xxx

Sunday, 1 July 2012

A recipe a day keeps the bikini (hidden) away!!

This baking fad I have launched upon is great for the taste-buds, and for the soul... but not so great for the diet! BUT right now I don't care. I will happily do an extra 20 minute "shred" a day with Jillian Michael's shouting at me through the TV if it means I can eat more cookies!! I am happily working my way through my newest cook book, The Hummingbird Bakery "cake Days". I know I have mentioned this book a few times but honestly, everything I have made from it has turned out brilliantly! Here are the two recipes I have made this weekend...

Apple and Currant flapjacks: These were lovely cold, but so much like apple crumble that they taste great warmed up with ice cream too!!


White Chocolate Cookies and Milk Chocolate Cookies.

This is actually a recipe I adapted from the Hummingbird Bakery book, The Original was white chocolate and cranberries. I did make a variation of this with currants as I'm not a huge fan of cranberries; and they were a lovely mixture of gooey chocolate, chewy currants and warm spices. However tonight I have made cookies for the team at work tomorrow and I know lots of people wont like cinnamon, or currants etc so Iv kept it simple and stuck to a batch of white choc cookies, and a batch of milk choc!

Balls of cookie dough! 

Fresh from the oven


I hope the folks at work enjoy these tomorrow! Happy baking people!! xxx

home sweet home... I love Devon!

I'm sorry for the lack of posts recently! I actually wrote this blog last week after spending the weekend in Devon, but our home internet is very temperamental at the moment so I haven't been able to upload it until now. Although it's a bit late I hope you still enjoy some of the photos I took...


One of my favourite things to do when I'm at home is walk the cliff path. We live in Alwington, a tiny village near Bideford. The photos above were taken along the stretch of cliff path between Bideford and Peppercombe. These pictures remind me of how beautiful Devon is and how much I miss home!! 


Some of you might remember the "new home" photos I posted in March, just after my mum moved into her new country house. I love the house and find the setting really relaxing. They are having the garden landscaped at the moment which I spent a few hours helping out with, and ended up completely knackered and FILTHY! The flowers are coming along beautifully though and give me a great excuse to play with the macro settings on my new camera! 


Hope everyone has had a lovely weekend in the sun! 

xx 


Monday, 11 June 2012

Shabby Chic Heart Garland - Tutorial


These hanging hearts make the perfect 'shabby chic' decoration, I have several around my flat, adorning book shelves and picture rails.  They make great presents, my favourite so far are the red and cream set I gave my mum for christmas (http://amz-afewofmyfavouritethings.blogspot.co.uk/2012/03/decorating-new-house.html). I have seen similar decorations in shops for £15-£20. I will show you here how to make this garland in a few hours for just a couple of £'s!!

You will need: 

  • Two pieces of different material of your choice (To keep costs down look for off cuts in your local haberdashery or secondhand fabric in charity shops) 
  • Plain fabric for backing (I used a piece of white cotton from an old pillowcase)
  • Twine (about £1 in local craft shop or garden shop) 
  • Toy stuffing (£3.50 for big bag, of which you will only use about 1/10th for this project, so lots of projects for your money!) 
  • Needle and thread
  • Sewing machine

Making your Garland: 
Steps 1- 4

Steps 5 - 8
  1. Cut out 4x hearts from each piece of fabric. I always use a stencil so that the hearts are uniform in size and shape. 
  2. Cut 8x 20cm lengths of twine. Again measure each piece to make this accurate, otherwise your hearts will not hang at the same height. 
  3. Double the twine over to make a loop, this is how you will hang your hearts from the garland. Hold the open ends of the twine together and attach to the right side of the fabric (see picture 3 above).  The reason for doing so is to prevent the loop moving whilst you are sewing the hearts. You can attach it either by hand stitching or machine stitching. You only need a few stitches to hold it in place, but it is very important that the twine is central to the heart and you attach it as close to the top of the heart as possible so that the stitches don't show when the heart is turned right way out. 
  4. Secure the twine in the centre of the heart using a single pin (see picture 4 above). This is to prevent the twine getting caught in the seams when you are sewing the heart. The last thing you want is to excitedly turn your heart right way out, only to find yourself having to snip bits of twine from the seams...believe me, I've done it! And it means the heart has no hanger, fail!
  5. Pin the heart right side down on the backing fabric (so that the pattern is facing the backing fabric). I like to use as few pins as possible because I find pausing in the sewing process to remove pins prevents the stitches flowing. 
  6. Stitch around the heart leaving a 5mm-1cm seam allowance. I always line the edge of the fabric up against the edge of  the machine foot (about 7mm) because this ensures you follow the shape of the heart. Remembering to leave a 3cm gap along one of the straight edges of the heart to allow you to turn it inside out.
  7. Turn the hearts inside out and using your finger or a blunt pointed object push out the point of the heart. using the toy stuffing fill the hearts evenly so that they are plump but not so much so that the seams are stretched! 
  8. Using a needle and thread hand sew the 3cm gap closed to complete the heart. 
  9. Cut a 155cm length of twine. Loop over 5 cm at each end and tie a knot to make loops to hang the garland. Pass the twine through loops of the first heart and situate it 15cm from the end of the twine. When in the desired position make a knot to hold the heart in place. Place a heart every 15cm along the twine, there should be 15cm at each end. 
  10. Hang your garland and admire your hard work!! 


I got away from the oven and back to the sewing machine yesterday, as promised! I hope you enjoy the tutorial. I would love to see any pictures if you make these hanging hearts xxx

Sunday, 10 June 2012

Custard and Cinnamon Tart


I seem to be on a bit of a baking mission at the moment, and I know I have blogged a lot of cake posts recently... so for those of you who pop over from folksy, I promise I will get back to the sewing machine soon! But for now I am loving the baking bonanza. For my birthday recently my sister gave me the hummingbird bakery book and it is AMAZING! All of the recipes I have tried so far have turned out brilliantly. The photographs in the book are beautiful and really well staged with pretty china, flowers and ribbons; very inspiring! I think I need to work on making the photographs on my blog a little more staged and 'arty', but it is difficult to find a clear, white surface in our tiny flat!

My most recent 'bake' was this custard and cinnamon tart from the hummingbird bakery "Cake Days". I won't include the recipe because I'm sure it will break copyright but I have taken some photos, although they are not as arty as I would like! I have made pastry before but not for a long time so this was a nice refresher. The process of making your own pastry is a little lengthy (mostly because it needs to rest in the fridge several times during the process) but well worth it. And as always custard is SO much better when made from scratch, but again is a little time consuming!! See what you think of the pictures but I think the wait was well worth it!


Right, I'm off to the sewing machine now! promise!! xx