Tuesday 22 May 2012

Patchwork

I have previously shared here my square patchwork quilt, which I have yet to finish! It is bigger than a double duvet so it is a bit of an ongoing mission. I have to admit I'm a bit of an instant gratification kinda girl and I like to sit down of an afternoon and by the evening be able to hold something up and say "I made that, and its finished". That is not what you get with a full size patchwork quilt! So I do get the quilt out about once a week and work on it, and it is coming along nicely, but to keep me interested (and sane) I do other little projects in-between. Yesterday I sat down to try my hand at patchwork patterns. This is the first time I have attempted any kind of patchwork that doesn't involve just sewing squares together... and I really enjoyed it! Because it was my first attempt I wasn't too concerned with matching the fabrics or colours, I just used some spare fabric I had lying around, so excuse the mix-match! 


I have learnt two valuable new things: 1. I really, really need a rotary cutter and board... I said this repeatedly when making my patchwork as cutting out perfect squares is difficult with scissors and has a huge impact on the final piece... if it's out by even a few millimeters you can tell (why did I not buy one sooner!) And 2. Do NOT use stretchy material!! The stripy fabric is a little bit stretchy which makes it a nightmare to sew! It also melts when you iron it, which makes it very difficult to work with and resulted in me scraping bits of melted fabric from the bottom of my poor iron!


You can see where the stripy fabric patches are a little lopsided... the result of stretchy material and inaccurate cutting! I'm a bad workman, I'm going to blame my tools (need that rotary cutter) but I think my impatience may also be a little to blame! must work on that! 


I like that with patchwork if you turn a few little squares around you can start with the same piece but a end up with a completely different pattern! so many possibilities... 
Now, I know I said this was a little tester piece... and it was, but I'd hate to see it go to waste. So I had to turn it into something useful, and a girl can never have too many cushions...Right??

The cushion has a new home in the peaceful, sunny little corner of my room. 
Iv just realised its a kind of strawberries and cream colour scheme... I'm not so opposed to it now, the little cushion is growing on me. xxx

Friday 18 May 2012

Who said city living can't be beautiful...

Hello,

I don't know if I've mentioned this here before but I'm from North Devon and moved to Bristol originally for university and stayed here when I got offered a job. I love Bristol, but I'm a true country girl at heart and on a sunny day nothing quite compares to the coast of North Devon. So when it is warm it is lovely to be able to get back to nature without leaving the city.  We made the most of the brief spell of sunshine a few days ago and went on one of my favourite walks in Bristol, Snuff Mill. This riverside walk between Fishponds and Frenchay, two quite built up areas, somehow manages to make you feel like you are in the middle of the countryside! Who ever said cities can't be beautiful...


I bought a new camera a few weeks ago and other than many cupcake photos for the blog I haven't had much chance to test it out, so I tried a few close-up shots to test the macro...


I've seen a few really cool photo collages where people have found trees, nature and everyday objects that resemble letters and have used this to spell words. There are lots of companies around who will create professional collages that spell whatever you want them to and even have different choices for each letter. They are beautiful and make lovely presents, but they are also hugely expensive. I Liked the idea of giving it ago purely for my own enjoyment... and it was a lot harder than it looked!!! Could I find any tree, branch or root that looked like the letter A... NO! So I went for the top of a fence... But I do like the overall effect as you can see the river in the background. What do you think? Give it a go for your self; I think it could be personalised to make great homemade cards. 


xxx

Tuesday 15 May 2012

Teddy bear's picnic.

It's my birthday this week and due to poor (or brilliant) organisation, all of my friends and family have been in different places at different times... so today I had celebration number 3 out of 5!! At the weekend I had a lovely meal with my dad, and then the following night a great night out with friends from home in one of my favourite local pubs! Sadly (or gladly as I had had a few drinkies) there are no photos from the weekend. I made sure to get a few snaps of todays celebration. Today I was seeing my mum, brother and three year old niece; so in fitting with the company (and due to the unpredictable weather: sunshine and hail!!) we had an indoors teddy bears picnic! I baked Cupcakes and my brother and niece made cookies... add in another ton of party food, a picnic blanket on the floor and a few well loved teddies we had ourselves a picnic! 


I got a whole massive, amazing bag full of Cath Kidston presents from my mum today! Including the new apron I am sporting in the picture below... I am very clumsy so I always end up covered in various ingredients by the end of a baking session! Please forgive my hair, I got caught in the previously mentioned hail storm! Also note my new, beautiful cake stand in the cupcake pictures... a good excuse to bake more cupcakes! 


I made two batches of cupcakes this morning. The first was a banana cupcake with custard butter icing with a dried banana chip to top it off. And the second was a vanilla cupcake with pink strawberry butter icing, and a fresh strawberry to decorate. I will go into more detail about the recipes another time... The custard butter icing was a bit of a "make it up as you go" recipe as I couldn't find one anywhere. It took quite a lot of trial and error but Im glad I stuck at it because nothing goes together as well as bananas and custard! 


Thank you to all my lovely family and friends for your company and beautiful gifts over the last few days... special mention to Sarah's card that winged its way from Australia to wish me happy birthday! xxx

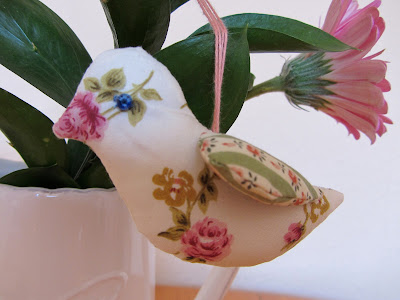
tweet tweet...


Hello birdie,

The inspiration for this cute little creature originally came from the Cath Kidston book, sew. The original was designed to be a child's mobile but I thought they would look super cute hanging around the home, so here is my version of little birdie. Today he happens to have taken up residence in the bunch of flowers in my very cute birthday present jug! Now, I don't have a garden, but how cute would it be if I managed to make the birds out of waterproof oilcloth and they could be hung in a tree in the garden... maybe in a blossom tree... one day!! 


To make a hanging bird:

  1. Draw and cut out your bird template
  2. Cut the bird pattern from two pieces of identical fabric and place them facing together
  3. Sew around the bird's outline using a 1/4 cm seam allowance. Leave a 3cm gap along the birds back to allow you to turn the bird inside out. 
  4. Now that your bird is facing the right way fill using toy stuffing until the body is quite firm. Hand sew the seam shut. 
  5. To make the wings cut 4 identical pieces of fabric in the shape of the wings. To make each wing place two of the pieces right side facing together and sew around the edge like you did with the birds body, remembering to leave a gap to turn and fill. 
  6. Only lightly pad the wings otherwise they will not hang down beside the bird's body. Sew shut the seam and hand sew the wings to the body. 
  7. Sew on a bead for each eye. 
  8. Use a piece of thick thread or ribbon as your loop and attach just between the top of the wings, this will ensure the bird hangs straight. 
  9. Find him a lovely home!! 


tweet tweet xxx

Wednesday 9 May 2012

indulgent chocolate cupcakes with chocolate and peanut butter frosting


My current mission is to bake a new cupcake recipe every week. I plan to spread the cupcake love with my friends and family. I took these very naughty but very nice cupcakes to work and they helped to keep us going through a long night shift. Now, I have to confess that I might have the sweetest tooth in the world. Have you ever heard people say "its far too sweet" or "its so sweet I can only manage a bite".... well that is not me!! I do not understand the term "too sweet"! I have to say though this cupcake has the potential to be a very sweet treat, but I find that the peanut butter gives it the savory edge and prevents it being the kind of sickly sweet that these crazy people complain about. The peanut butter gives the frosting a lovely creamy, sticky texture. these might just be my favourite cupcakes so far...


The sponge:


This is a very simple, one bowl sponge recipe from the trusty Delia Smith complete cookery course book. I have adapted the recipe by adding an extra egg and a teaspoon or oil or warm water to make it a little more moist. I also added an extra table spoon of coco powder because like I said, Sweet tooth! Here is the original recipe, feel free to tweak it at your will:

4oz (110g) self-raising flour
1 teaspoon baking powder
4oz (110g) butter
4oz (110g) caster sugar
2 (or 3) large eggs
1 (or 2) tablespoons of coco powder

And now follow the simplest baking instructions in the world... sift the flour into a bowl and add all the other ingredients. Mix well for several minutes. The mixture should fall easily from a spoon when tapped against the bowl. If the mixture is too thick this is when you can add the teaspoon of warm water until you are happy with the constancy. Fill your cupcake cases 1/2 - 2/3 full; note if you put more than this in each case they will spill out everywhere and you wont be able to ice them... believe me, I have done it!! Bake on gas mark 3 (170 degrees) for 20 minutes or until a knife inserted into the cupcake comes out clean. The cakes should rise so that thy come just over the top of the case...


Now for the best part of the cupcake process... the icing! I have used two types of frosting in this recipe, chocolate and peanut butter.

Chocolate butter cream Frosting:
50g butter softened
50g icing sugar
1-2 tablespoons of coco powder
1 tablespoon of full fat cream cheese

Cream the butter and sugar and coco powder together.  Slowly add the cream cheese and mix again. If the icing needs to be thicker you can add a tablespoon of icing sugar at a time until you reach the desired consistency. If it is too thick add a tablespoon of milk, or a tablespoon of cream cheese.

Peanut butter frosting: 
50g butter softened
50g icing sugar
1 table spoon of peanut butter
2 tablespoons of cream cheese

Cream the butter and sugar together and then mix in the peanut butter. Add in the cream cheese slowly. Due to the consistency of peanut butter this icing tends to be thicker than the chocolate butter cream. When piping two icings together it helps for both icings to be of the same consistency so you will need to add milk or cream cheese until this frosting is thin enough to pipe.  when adding the icing to the piping bag place the chocolate down one side and the peanut butter down the other, this means that when you pipe you will get a beautiful combination of the two icings.


enjoy xxx

Wednesday 2 May 2012

carrot cake cupcakes for dinner!!


I decided to branch out into the beautiful edible art of making cupcakes, so I went along to the shop and spent more money than I intended to on a good deep cupcake tray and some very cute cupcake cases among other probably unnecessary cute cupcake items! And this was my first attempt at the cupcakes... I think I got a little over excited while I was filling the cases and didn't follow the golden rule of only filling the cases 2/3rds of the way up... result = minor cupcake overflow emergency!! Therefore when I took a naughty but very excited little peak at my cuppycakes after 15 mins in the oven I was greeted by the sight of one massive tray of spilled cupcake mixture! Thankfully with a little bit of trimming after the cupcakes were cooked (which also meant I could eat all the trimmings!!) the cupcakes once again resembled cake shapes rather than a blobby mess! This was also my first attempt at using an icing bag to pipe icing, and it wasn't too bad, will definitely take a bit of practice to perfect. I think it helped putting the cream cheese icing in the fridge to set first because this made it much easier to work with! Even with their messy shape and splodgy icing I love the cupcakes and they are very yummy! so yummy that I cupcakes for dinner tonight!! xxx